

Getting Started with Login Enterprise v4 API
November 16, 2020
The Login Enterprise 4.3.12 release had a long list of improvements.
One, in particular, was the new v4 API (Application Programming Interface). This new version of the API added the ability to read and write configurations to the appliance. Today I am going to walk through how to take advantage of this new feature.
What is it? What can it do? Why do I care?
The v4 API is a way to interact with your Login Enterprise appliance without going through the UI. You can use this new way to create accounts, do bulk updates, configure tests, run tests, and more. Instead of navigating around the UI to complete tasks, you can script or automate those tasks that can save you time and allow you to connect from and to other systems that know how to work with APIs. With an API, you can program tests, create users and groups in bulk or manage configuration as with any configuration management software. You can connect Login Enterprise of workflows or automated processes to create test sets or scenarios in a templated and repeatable fashion…the limits are only the imagination.
The New Login Enterprise v4 API can save you time
How do I use it?
The v4 API is RESTful API, so we use a REST API client to interact with the API. Login Enterprise ships with a web-based REST client already installed and available. This web-based REST client is delivered via a component called Swagger UI. Swagger UI lets you explore an API and test making requests without installing any software on your computer.
To navigate to the Swagger UI page:
- Login to the Login Enterprise UI
- Select the “External Notifications” Tile
- Select the Public API Tab (This is where you will create your API key later)
- Select the “Public API Documentation” link
- A new tab will open to the API documentation. Locate the “4.0 API Console (Swagger)” link and click
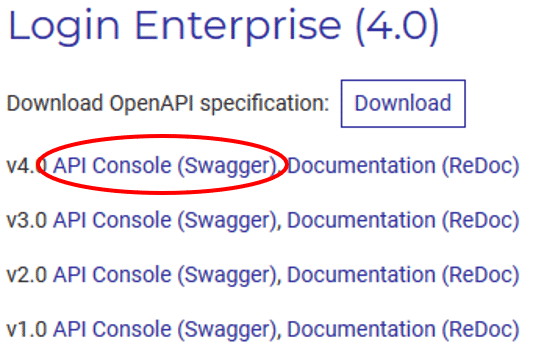
You have arrived!
Using the Swagger UI
To start playing with the v4 API, we will go over the features of the Swagger UI, authorize our requests, test some requests and read the responses. One of the benefits of the Swagger UI is that the request and the inputs are a web form. The Swagger UI will even show you the request it makes and the response. You get documentation, examples and a tester all in one.
Creating an API key
APIs are meant for computers to talk with each other. We want a way to authorize access without using a username and password. An “API Token” is the standard way of granting access to an API. This API key makes sure I do not have to put my username and password into a file somewhere. The key can be removed at any time without affecting my user account. An API Token is just a randomly generated string. Any request we send in must include this string to be valid.
To generate the key:
- Login to the Login Enterprise UI
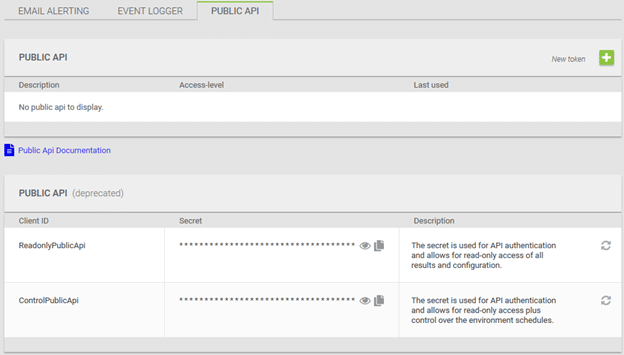
- Select the “External Notifications” Tile
- Select the “Public API” tab
There are two Public Api sections…new – PUBLIC API – and old – PUBLIC API (deprecated). We will use the new (topmost). Click the green “+” symbol next to “New Token” in the upper right corner.
We need to provide:
- Description: MyAPITestKey
- Access-Level: Configuration
We want to see just what we can do, and configuration is the level for us to do that.

What happens next? When you click save, a new key is generated and displayed…but only one time. As soon as you click close, there is no seeing that token again, so copy it and paste it somewhere safe.
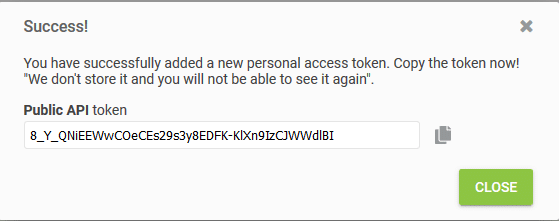
Your new key only appears once – so copy it and paste it somewhere safe.
OK, we have our key; now we can test.
Using Swagger UI to test
Now that we have an API Token, we will use the Swagger UI to submit a request to the API and look at the result. We do have to authenticate, so let’s get that out of the way.
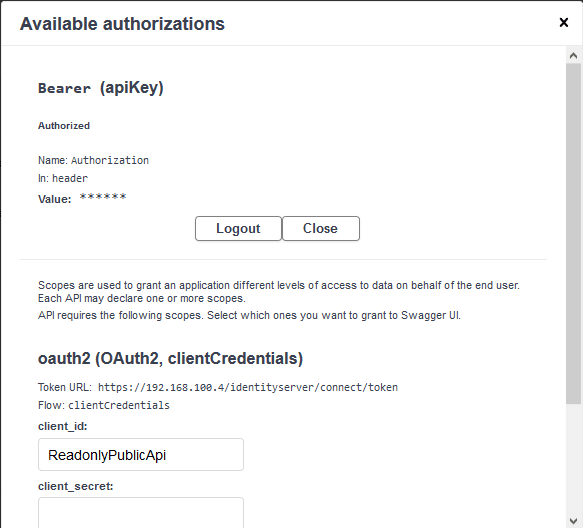
Authentication
The API will only accept requests that come in with authorization. To use our brand-new token to authenticate our requests, we head back to the Swagger UI and click the Authorize button.

In the Bearer (apiKey) value box, paste the key that we created in the previous step and select “Authorize.”
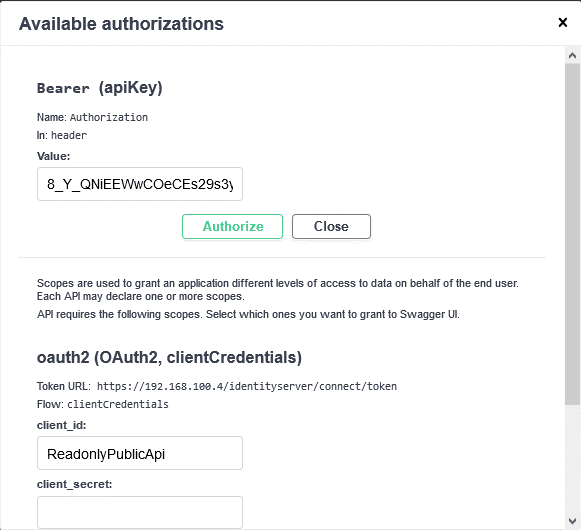
Then select close. This will bring you back to the Swagger UI, and we are ready to run our first test.
Running your first test – Reading Applications
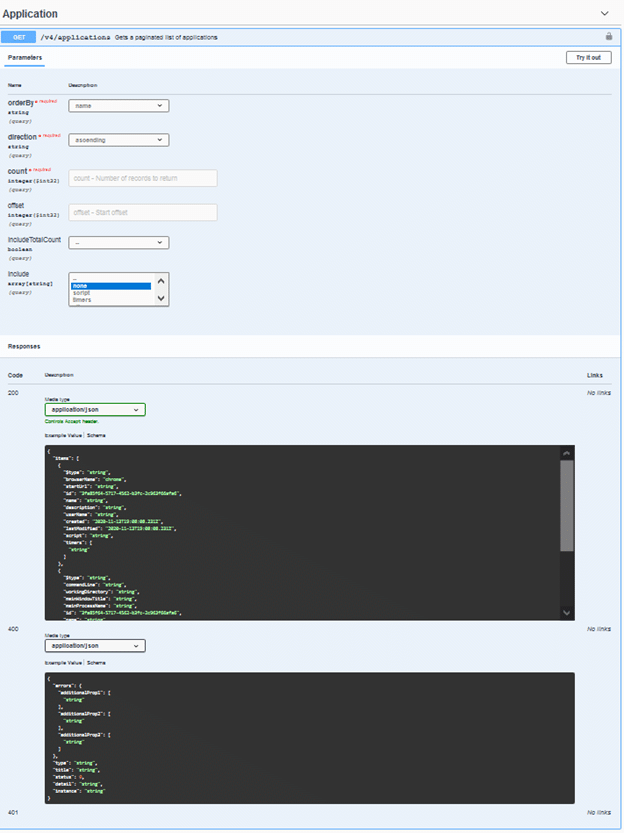
Scroll down until you find the heading “Application.” Swagger UI has automatically created a list of acceptable API requests to interact with the Applications on the appliance. We will use the first request, “GET /v4/applications Gets a paginated list of applications,” to ask the API to give us a list of applications configured on the appliance:
- Click:

- This exposes a web form that informs you of the required and optional fields we must complete making a request. It also shows you what the potential responses are. This is important for programmers, so they know what to expect and can write code to handle the possible responses.
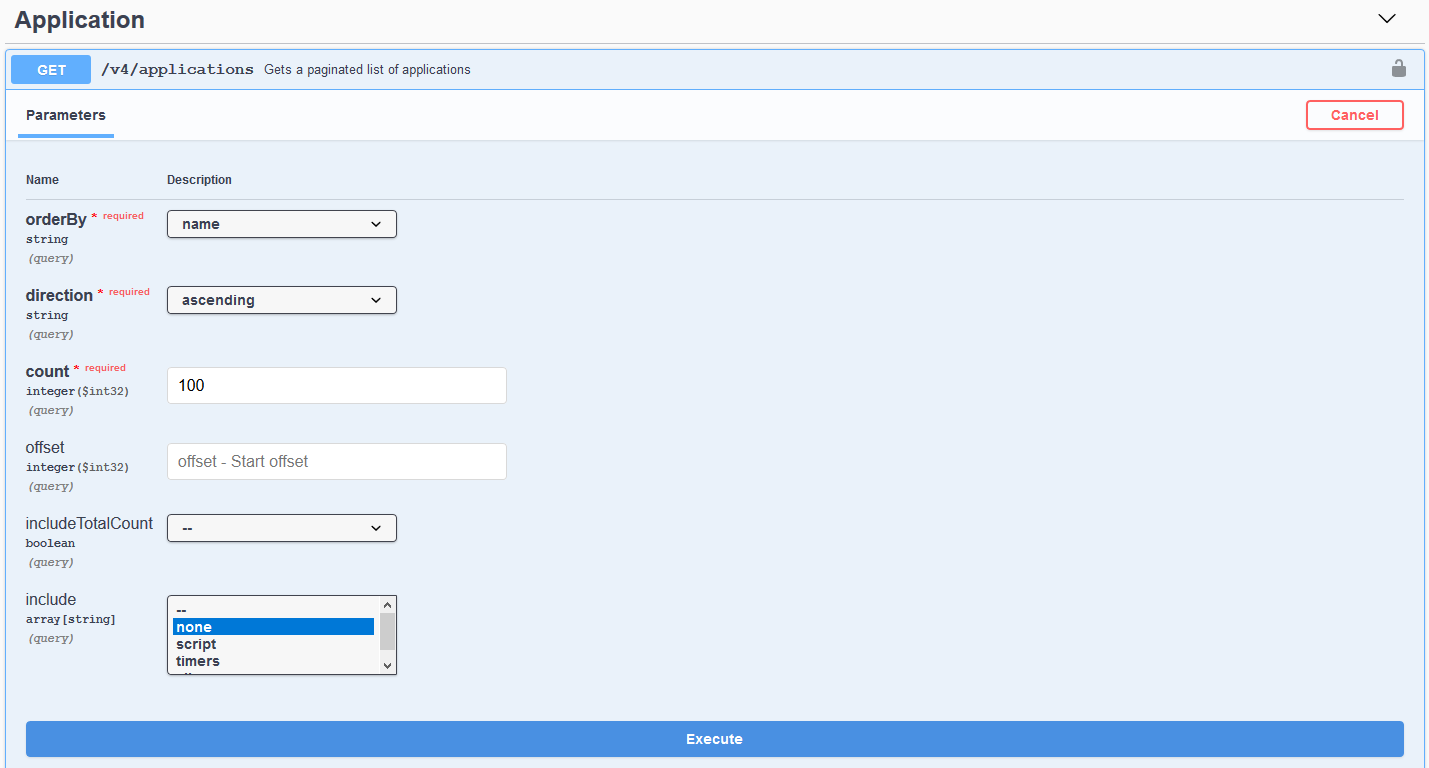
This form is still read-only…to enable it so we can fill it out, we have to click the “Try it out” button at the top of the webform: 
- Now that the for is enabled lets execute a test. We do have to add a number to the count field…but the rest of the form is preset with sensible defaults. Add 100 to the count field and click “Execute”
- After you click Execute, the web form will update with the response and it should look like this:
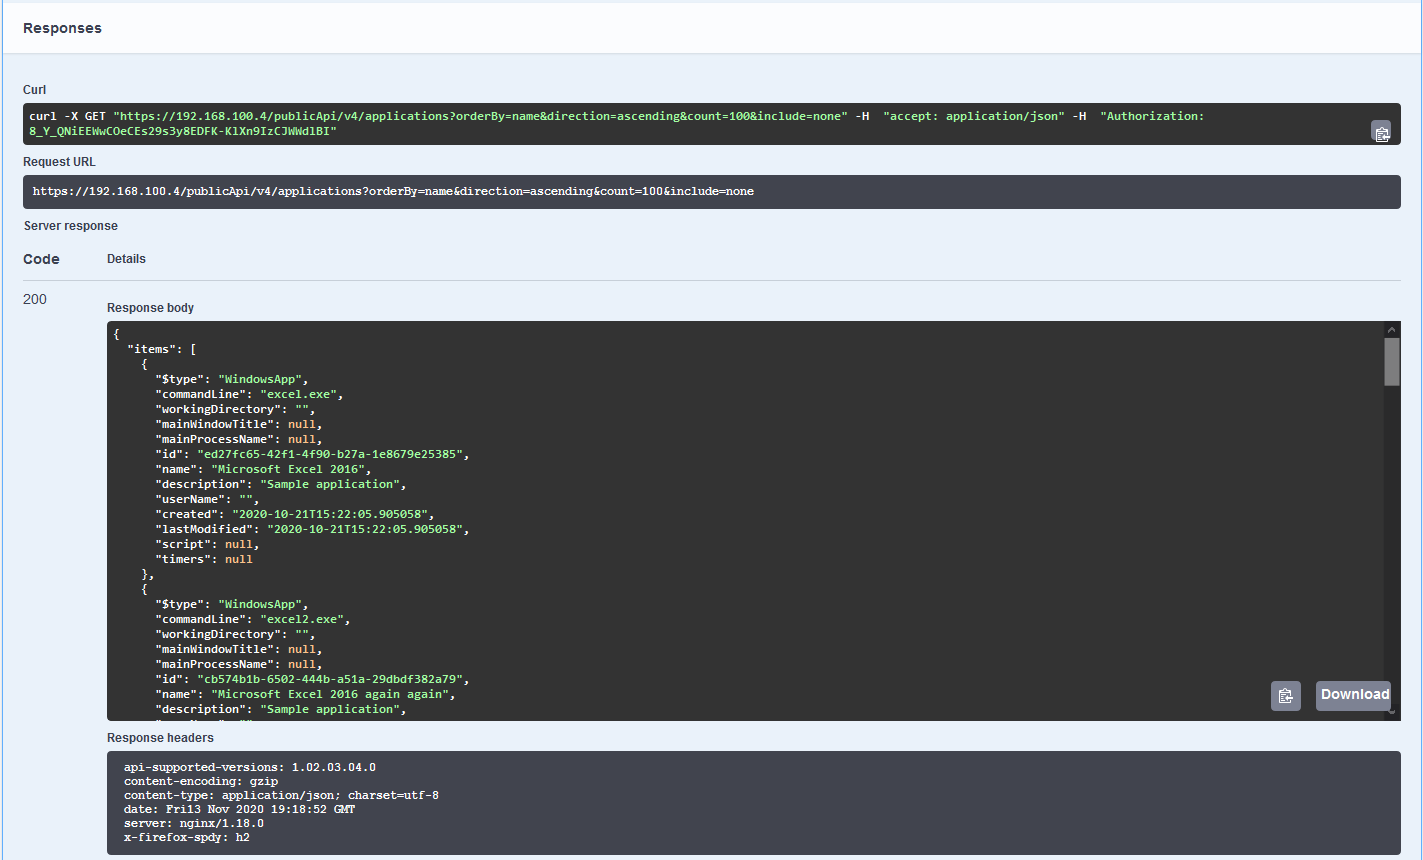
If your response code says 200, you were successful. Congratulations! You have just successfully sent in a REST based request and received a response via the Swagger UI!
In the response body, you will have a JSON (JavaScript Object Notation) formatted list of applications and the relevant fields of their configuration. Again, it is the output that only a computer should love (no judgments here). This process is what programmers can use to program other systems to “talk” to the Login Enterprise appliance.
OK, now that we know how to get a list of applications, let’s see what creating an application through the API looks like.
Creating an Application
Creating an application with the API follows a similar process; however, it is a bit harder. The request form wants us to submit the application configuration as JSON. Let’s have a look:
When we asked for a list of applications, the result of a single application looked like this:
{
“$type”: “WindowsApp”,
“commandLine”: “excel.exe”,
“workingDirectory”: “”,
“mainWindowTitle”: null,
“mainProcessName”: null,
“id”: “ed27fc65-42f1-4f90-b27a-1e8679e25385”,
“name”: “Microsoft Excel 2016”,
“description”: “Sample application”,
“userName”: “”,
“created”: “2020-10-21T15:22:05.905058”,
“lastModified”: “2020-10-21T15:22:05.905058”,
“script”: null,
“timers”: null
}
When we create an application, the request body will have to look like this:
{
“$type”: “WindowsApp”,
“commandLine”: “MyTestApp.exe”,
“workingDirectory”: “”,
“mainWindowTitle”: null,
“mainProcessName”: null,
“name”: “A Test Application just for writing blog posts”,
“description”: “Test application”,
“userName”: “”,
“script”: null,
“timers”: null
}
Let’s create an application.
- Click on “POST /v4/applications Create application”
- Click the Try it out button

- Paste in the application we want to create:
{“$type”: “WindowsApp”,
“commandLine”: “MyTestApp.exe”,
“workingDirectory”: “”,
“mainWindowTitle”: null,
“mainProcessName”: null,
“name”: “A Test Application just for writing blog posts”,
“description”: “Test application”,
“userName”: “”,
“script”: null,
“timers”: null
}
- Select Execute
If you get a response code of 201, success!
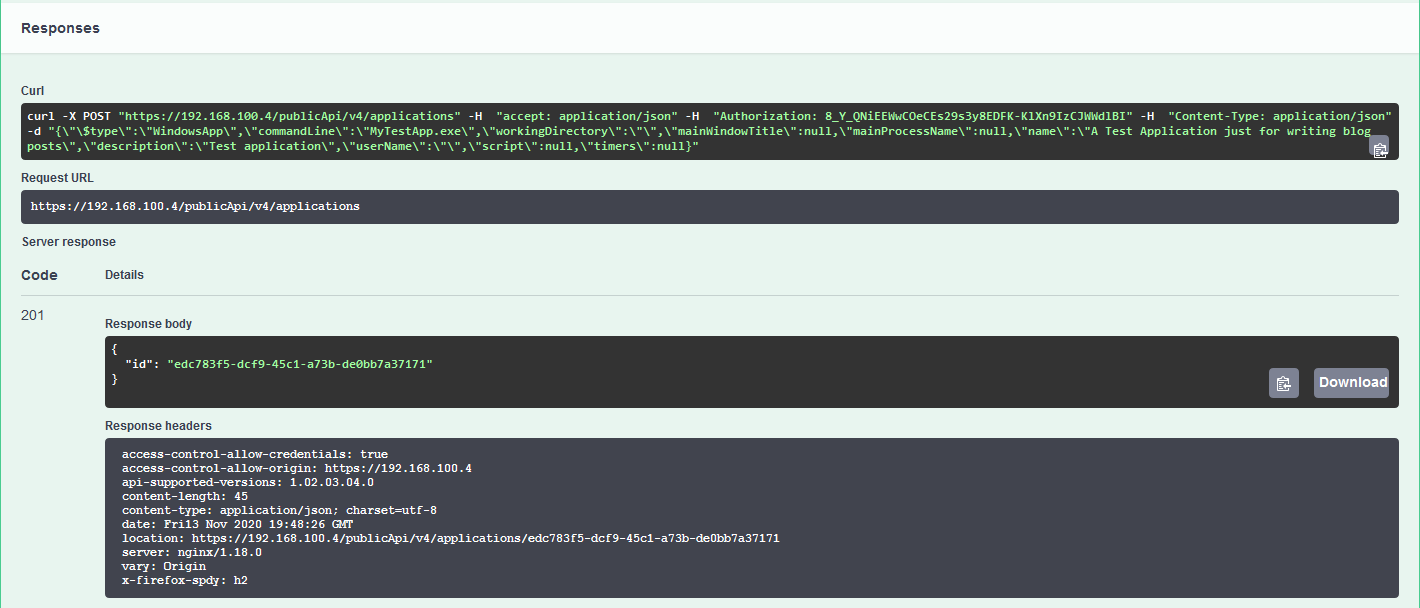
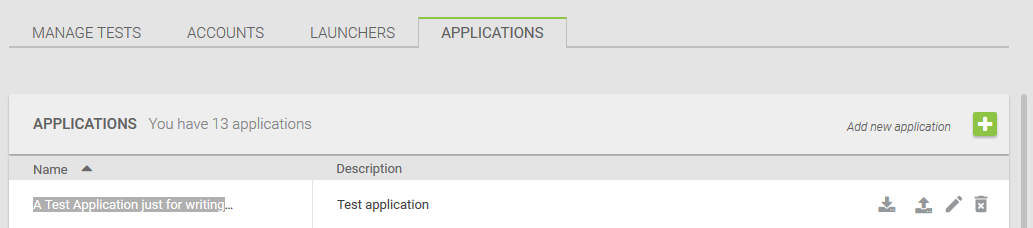
The response will be the id of the new application. We can verify this via the Login Enterprise web UI:
- Login to the Login Enterprise UI
- Select the “Applications” Tile
- Locate your new application by the name you submitted above (“A Test Application just for writing…”)
Parting Notes
The point of an API is to allow computers to interact with each other…not humans. However, this opens up the door for us to do some exciting things…as humans.
Right about now, you may ask your self “what about using scripting languages (i.e., PowerShell, etc.) instead of full programming? As it happens, that is where this blog series is heading next.
Stay tuned! We will use other REST clients like Postman and yes, even PowerShell to do things like bulk updates, data exports, test configuration, and more in future blog posts.
APILogin Enterprise Release
